
This minor update contains a few new features:
Lava™ Design View Manipulation Controls
If you have been used to using the Lava™ Design software to rotate, pan, and zoom your models, you will be happy to know that you can use the same controls now in the C.O.S. Laboratory software. Just tap the SPACEBAR key on your keyboard and you can use the mouse to manipulate the 3D scan data:
• Left mouse button = Rotate model
• Right mouse button = Pan model
• Middle mouse button = Zoom model
When you are finished with your view manipulations, just tap the SPACEBAR key again to return to the normal edit mode. Note that all of the previous ways to manipulate the model still work.
Email Trainer
We now provide a way to directly E-Mail a laboratory trainer that can help you with your margin-marking questions. Just choose File -> Request Assistance -> Email trainer.
If you are in the margin-marking step of the software, you will be able to annotate and attach pictures to your E-Mail. If you are in the Bite Plane or Die-Cut steps, then you will just be prompted to type a note.
Request Digital File Clean Up
This is the command formerly known as Request Analysis and is used to submit your case to 3M to correct field or scan issues from the doctor (as applicable). Just choose File -> Request Assistance -> Request Digital File Clean Up, and the case will be sent to a 3M technician for review and correction. Please include a descriptive note of the problem area to expedite the process.
This update will be rolled out over the weekend. For guidelines on how this update will work click here.
Oct 29, 2009
Labs: Upgrading the Laboratory Software for Lava C.O.S.
3M will be upgrading all installations of the C.O.S. Laboratory Software. The software will handle most of the work for you, but there are some things you will need to do.
1. You will see a dialog appear asking if you want to download the new version of the software. Click Yes. 2. You will see the download progress bar move until the download is complete. Then the Run Update button will become available. Click that button.
 3. The software will warn you that the upgrade process will require shutting down the application. If you need to save your work, click No and save first. Otherwise, click Yes to begin the installation immediately.
 4. The software will shut down, and the installation process will begin. Click the Next button 3 times to begin the installation.
 6. Double-click the shortcut on your Desktop for the 3M ESPE Lava(tm) C.O.S. Laboratory Software. You should now see that the software version is 2.5.1 on the login screen. Your update is complete!
If you run into any problems during this update process, feel free to contact customer support at 1-877-722-6528.
1. You will see a dialog appear asking if you want to download the new version of the software. Click Yes.
 2. You will see the download progress bar move until the download is complete. Then the Run Update button will become available. Click that button.
 3. The software will warn you that the upgrade process will require shutting down the application. If you need to save your work, click No and save first. Otherwise, click Yes to begin the installation immediately.
 4. The software will shut down, and the installation process will begin. Click the Next button 3 times to begin the installation.
 6. Double-click the shortcut on your Desktop for the 3M ESPE Lava(tm) C.O.S. Laboratory Software. You should now see that the software version is 2.5.1 on the login screen. Your update is complete!
If you run into any problems during this update process, feel free to contact customer support at 1-877-722-6528.
Oct 22, 2009
Doctors: Margin Annotation Tools
If you think the lab might find any part of the margin ambiguous, the Margin Annotation tools will help you make it clearer. You do this while reviewing the close-up video stills of the margin. Press the Stereo 3D Icon, put on your 3D glasses, and press the Margin Annotation Icon.
 1. Hold your finger on the margin in the
ambiguous area.
2. Roll your finger on screen to align
crosshair on magnified margin edge.
3. Remove finger to place a yellow dot.
4. Add more dots as necessary.
To remove incorrect margin annotation:
1. Press the Removal Button.
2. Then touch the yellow dot to erase it.
Remember: To view the margin at 50X without placing dots, press the Magnifying Glass Icon!
 1. Hold your finger on the margin in the
ambiguous area.
2. Roll your finger on screen to align
crosshair on magnified margin edge.
3. Remove finger to place a yellow dot.
4. Add more dots as necessary.
To remove
 incorrect margin annotation:
1. Press the Removal Button.
2. Then touch the yellow dot to erase it.
Remember: To view the margin at 50X without placing dots, press the Magnifying Glass Icon!
Oct 15, 2009
How Models Are Manufactured
Patrick Dunne, Rapid Manufacturing Manager, explains the model production process:
Oct 6, 2009
Doctors: Lava C.O.S. . . .A Look at Our End
Check out the article by Jeff Saylors of Saylors Laboratory on Lava C.O.S. He offers a great perspective as to what happens after you scan.
Click Here for full article
Click Here for full article
Oct 5, 2009
3M Announces the 1st Lava C.O.S. Lab User Group Meeting
We will be holding the 1st Lava C.O.S. Lab User Group Meeting in Lexington, MA on November 6th. Below is the preliminary schedule. Click here to register. Space is limited.


Oct 2, 2009
Doctors: Save Time on Prescriptions by Using Defaults
You can use the Save as Defaults option on the prescription screen to save the current lab and restoration selections as your defaults. In this way you don’t have to re-enter the same information for each prescription.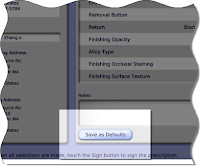
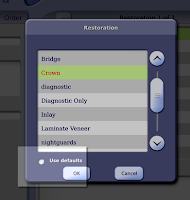
After you fill out a prescription, press the Save as Defaults button. That will save the entries you made for this restoration, including your notes, and the Lava C.O.S. system will add them to its Restoration list. The next time you fill out a prescription for the same type of restoration, these default restoration entries will be available as an option on the Restoration Types list box. Just select “Use Defaults” and press OK and the prescription is populated with your default choices.
Please note that the defaults are not shared across the Lava C.O.S. system. Each default is unique to: 1) the user, 2) the type of restoration, and 3) the lab. In other words, the same default restoration is not shared by different doctors, different labs, or different types of restorations.
For example, if Dr. Jane Smith sets up the default characteristics for crowns to be sent to ABC Laboratories, those defaults will be available as an option on the Restoration Type box only for the crowns she prescribes. Her business partner Dr. Samuel Brown, who shares the Lava C.O.S with Dr. Smith, will not have access to those same defaults. When he writes a prescription and the Restoration Type box is displayed, the Use Defaults option will be grayed out… that is, until he creates his own set of defaults.
Further, only one lab, ABC Laboratories, can be listed on Dr. Smith’s crown default prescription. If Doctor Smith also sends crowns to Acme Dental Lab, she will have to create another default prescription that lists Acme instead of ABC.

Save As Defaults button
After you fill out a prescription, press the Save as Defaults button. That will save the entries you made for this restoration, including your notes, and the Lava C.O.S. system will add them to its Restoration list. The next time you fill out a prescription for the same type of restoration, these default restoration entries will be available as an option on the Restoration Types list box. Just select “Use Defaults” and press OK and the prescription is populated with your default choices.

Use Defaults option is now active on Restoration type box
Please note that the defaults are not shared across the Lava C.O.S. system. Each default is unique to: 1) the user, 2) the type of restoration, and 3) the lab. In other words, the same default restoration is not shared by different doctors, different labs, or different types of restorations.
For example, if Dr. Jane Smith sets up the default characteristics for crowns to be sent to ABC Laboratories, those defaults will be available as an option on the Restoration Type box only for the crowns she prescribes. Her business partner Dr. Samuel Brown, who shares the Lava C.O.S with Dr. Smith, will not have access to those same defaults. When he writes a prescription and the Restoration Type box is displayed, the Use Defaults option will be grayed out… that is, until he creates his own set of defaults.
Further, only one lab, ABC Laboratories, can be listed on Dr. Smith’s crown default prescription. If Doctor Smith also sends crowns to Acme Dental Lab, she will have to create another default prescription that lists Acme instead of ABC.
Subscribe to:
Posts (Atom)
